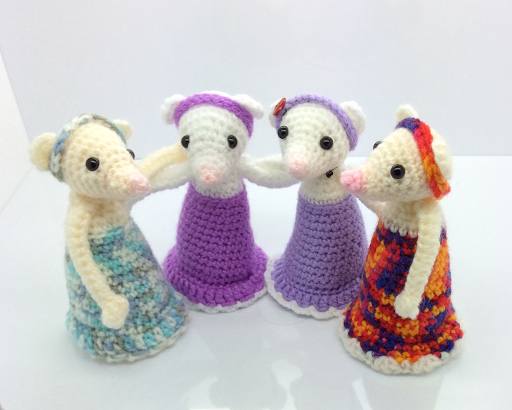
Lily the Mouse is part of the “Lily and Albie” project I designed for the “Animal Parent and Baby” amigurumi design contest hosted by amigurumipatterns.net. Lily measures ~ 11 cm. Because of the way she is designed, she can stand on her own and there is no need to make her legs.

What you need
- DK yarn in dress colour, white & light pink
- 3 mm crochet hook
- 6 mm black safety eyes
- Polyester stuffing
- Yarn needle
- Stitch marker for working in the round
Head
With light pink
R1: 4 sc in mr (4)
R2: sc in each, cc to white (4)
R3: inc in each (8)
R4: (inc, 3) twice (10)
R5: sc in each (10)
R6: (inc, 4) twice (12)
R7: (inc, 1) x 3, 6 (15)
R8: (inc, 2) x 3, 6 (18)
R9: (inc, 3) x 3, 6 (21)
R10: (inc, 4) x 3, 6 (24)
Insert safety eyes between R 8 and 9, 2 rounds down from your current round, approx. 6 sts apart.
(Optional: If eye stems are too long, trim them a bit. It will make it easier to stuff.)

R11-12: sc in each (24)
R13: (dec, 2) x 6 (18)
R14: sc in each (18)
Start stuffing and continue stuffing as you go.
R15: (dec, 1) x 6 (12)
R16: dec x 6 (6)
FO.
Ears (make 2)
With white
R1: 3 sc in mr, ch 1, turn (3)
R2: inc in each (6)
R3: 3 sc back in magic ring (make sure you crochet over the initial tail of yarn, otherwise you won’t be able to pull the ring tight).
Ss in next st.
FO leaving long tail for sewing.
Sew to head ~ 3 or 4 rounds above the eyes.

Body / Dress
With dress colour.
R1: 6 in mr (6)
R2: inc x 6 (12)
R3: (inc, 1) x 6 (18)
R4: (inc, 2) x 6 (24)
R5: (inc, 3) x 6 (30)
R6: (inc, 4) x 6 (36)
R7: sc in each (BLO) (36)
R8: (dec, 4) x 6 (30)
R9-10: sc in each (30)
R11: (dec, 3) x 6 (24)
R12-15: sc in each (24)
R16: (dec, 2) x 6 (18)
R17: sc in each, cc to white (18)
R18: sc in each (BLO) (18)
R19: (dec, 1) x 6 (12)
R20-21: sc in each (12)
Ss in next FO leaving long tail for sewing.

Bottom of dress / Lace
Start with dress colour.
With top of body facing you, attach dress colour yarn in one of the free front loops of R6.
R1: ch 1, sc in same loop and in each loop across, ss in first sc (36 sc + 1 ss)
R2: ch 3, dc in next st, dc in each st across, ss in first dc (35 dc + 1 ss)
FO.

Attach white yarn.
R3: (ch 4, sk 1, ss in next) across
FO.
Sew head to body.
Headband
With dress colour
Ch 31.
Ss in 2nd ch from the hook and in each chain across.
Ch 6, ss back into the last ch (makes a little loop).
FO.
Place headband on the head and pull the end through the loop to tighten it.
Arms (make 2)
With white.
Ch 15, leaving long tail at the beginning (we’ll call this the initial tail).
R1: hdc in third ch from hook and in next 12, 3 hdc in last. Working on the opposite side of the chain, hdc in next 13. (29 hdc)
FO, leaving long tail for sewing at the end (we’ll call this the final tail).
Finishing
Take the initial tail through the middle to the other side, so that both initial and final tail are on the same side (see picture).

Fold arm lengthways over initial tail and sew together using final tail, going through all 4 loops (leave ~ 1.5 cm (~ 7 sts) unsewed at the end).
Fold this unsewed bit inwards and sew to rest of arm to make a little hand.
Sew arms to body using initial tail.


